Tuesday, April 6, 2010

Holy Crap, Two in a Row!

I'm feeling ambitious and doing yet another update today to brag about my productivity. (It's funny how taking a few days off from the creature will see your productivity rate soar)

I followed through with most of my ambitions from yesterday and sanded down the top of the starboard seatbacks where sailing hardware and mooring cleats will someday be anchored. I also finally cut out the roof supports, routed down the edge to make them less intrusive in the cabin, and epoxied them in. Here's a few photos:


This is the top of the starboard seatback. Spinnaker hardware will be mounted here eventually. Tomorrow I will hopefully anchor the top of the seatback in permanently. I still have quite a bit of sanding to do on the port side. Perhaps I'll purchase a heavier duty grinder soon...


Here are the roof supports being epoxied in. The supports just give the roof something a little wider to rest on while being epoxied in.


As you can see here we have the almost completed dorade boxes. Once the roof is in place over everything I will cut a few holes on top and again on the interior wall leading into the boxes and attached a couple of dorade vents. This will give me a nice little breeze while I'm camped out in the tiny cabin and it won't feel so stuffy. Pretty cool.

Tomorrow's plan after work is probably just a ton of sanding. I have a few small pieces of timber to anchor inside the dorade boxes as well, and perhaps I'll get the seatback tops on. All this is leading up to getting the roof anchored down on Friday or Saturday and beginning work on the companionway hood...


Monday, April 5, 2010

Loving the Early Spring Weather!


Well, it's rather amusing that the last post I wrote had to do with skiing and here we are 6 weeks later and it feels like mid-summer in New England. I don't exactly pretend this weather will hold out and I'm sure we'll get at least another week or two of crappy New England late winter weather. But here's hoping!
I have gotten quite a bit done since the last post, including installing the seatbacks and the remaining flotation foam. The bow is pretty much complete, fiberglassed and the upper breasthook is in. Over the last week or so I cut out the pieces that will create the cabin hood and put the final coat of epoxy on them today. I also installed a few pieces of wood in the seatbacks to anchor the spinnaker hardware and a mooring cleat near the stern. Lastly, I put the final touches on the fillets completing the installation of the dorade boxes. All in all, the boat is really starting to look good. I'm hoping I can get her flipped by the end of April so I can begin the daunting task of epoxying the entire hull and eventually getting her into a trailer to finish off the final month or so of work and hardware installation!
Here's a few pics of the current progress:


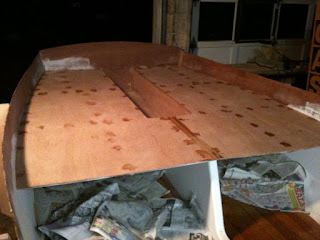
I decided to use a few bits of scrap plywood to create the seatbacks. It's probably not quite as professional looking as a solid piece of plywood would have been but I was happy that I saved myself $80. I have a ton of scrap plywood laying around now anyway. This is right after the seatbacks were installed, I have since filleted and sanded all the joints and the entire cockpit area is pretty much just waiting to be fiberglassed.


Despite what the plans dictate, I chose to cut out the hole for the tiller prior to installing the transom skirt. Mainly b/c I wanted to have room to fit the router on the interior and I wouldn't have had room with the transom skirt in place.


See... if the transom skirt had been in the previous picture the router wouldn't have fit on the interior side of the cockpit.


Here is the upper breasthook after installation. You can also see the pieces that make up the dorade boxes in the foreground. They have since been epoxied on the interior side and filleted in place.


They aren't actually filleted in yet in this picture but it gives you an idea of what the dorades look like.

The weather forecast looks pretty nice for the remainder of the week too so hopefully I can fit in some serious work each night. Now that summer is coming I'm definitely getting antsy to get her done and in the water. I really don't want to spend my summer finishing her!

Up next this week is to install all the support pieces for the cabin roof which involves cutting out curved pieces of wood and epoxying them along the curved areas wherever the cabin roof will rest. Then all that needs to be sanded perfectly smooth and anchoring the roof down hopefully later this week. This weekend will involve the beginning of the mast construction (and hopefully correctly the awful cut I made while ripping a 16' piece of sitka spruce) and hopefully a lot of progress toward completing the companionway hood and finishing the fiberglassing of the rudder. Perhaps I'll get started on the tiller as well... We'll see if any good plans come up (read: cute blondes)

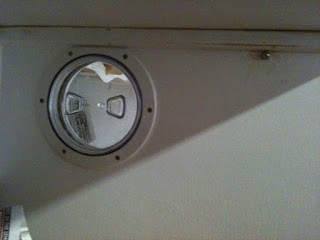
Here is a pic of the starboard inspection port on the centerboard trunk. The plastic piece unscrews so you can access the centerboard and either shove it down into the water if it's jammed or some other type of service. It's also kinda cool looking if you ask me. I'm also installing one on the bow inspection port with a nice looking varnished flange that I made. Pics to come soon...

Sunday, February 21, 2010

Gone Skiin...

Sorry for not putting up any updates lately. I have been fortunate enough this winter to spend quite a bit of time out on the slopes this winter with friends and co-workers, and this week will be no exception. I get to spend the first couple days of the work week skiing and call it "work" I will reiterate once again how much I love my job. Nothing all that new and exciting going on recently actually. I have started playing ice hockey again after a good 10 year long hiatus, and the Olympics is giving me the serious desire to learn curling too. I feel as though I would be ridiculously good at that "sport". But nonetheless, it's fun getting back out on the ice and getting rid of some frustrations.
Anyway, on to the boat... I've made a little bit of progress lately although I have slowed down dramatically due to weekend trips and the cold weather hindering my epoxy use. That being said I have begun assembling the cabin walls and the hull topsides and seatbacks. See the pics below.
I thought this one was funny b/c after snipping so many wires to stitch the boat together my wire snips broke. Oh well, they were cheap to begin with.


Here I'm temporarily stitching the topsides in place in order to properly locate the rear cabin wall...
As you'll see here the foredeck is not in place b/c the topsides are only temporarily in place. But you can see the flotation foam that is installed in the bow per US Coast Guard rules...
Here is a look at the cabin rood support beams in place. Eventually the deck and companionway will be here.
Even though the topsides are only temporarily in I think this is a cool picture b/c it gives you a good idea of the hull shape. Notice my footstool to get in and out of the boat is a case of beer. I think that's funny.

Here is the completed rudder, sanded down to 220 grit. This was fun to build b/c it's one of the few pieces I could work on in cold weather, (I brought it inside at night while the epoxy was curing) I still need to coat it in fiberglass and epoxy but that can wait till warmer weather I suppose.
That's it for now... At the moment I'm glassing the insides of the topsides and stitching them in place for permanent epoxy work. Cheerio!


Sunday, January 17, 2010

I Love the Smell of Epoxy in the Morning, It Smells Like... Victory.


I also love having MLK day off of work. I have been able to accomplish a fair bit due to the long weekend. I have officially completed chapter 2 of Pocketship! The lower hull is complete and work has begun on the upper hull. This is where the real excitement begins!

I was out in the driveway working away this afternoon taking advantage of the relatively warm weather. Hey, 40 degrees in January is practically shorts weather in New England! And I of course had the stereo cranked up pretty loud in the garage when my neighbor comes over and says the bass line to my trance music is "penetrating" A good adjective to use for that type of music I must say.... But I digress, I was polite and said I would turn it down, but he happened to see the boat in the garage and his immediate reaction was "Motherf*@ker! That's damn impressive! You've done all that from scratch!" I must say I enjoy people's reactions when they see the boat for the first time. It clearly is a source of great pride for me.

On to construction details though... I anchored down the seats the other day and peppered the deck with screws to hold it in place while the epoxy cured... I'm using the fast hardener in the colder weather, and I like to heat the epoxy up on my garage heater so the reaction moves extra fast. This has the downside of requiring me to work at lightning speed once the resin and hardener are mixed before the cup melts in my hand and I'm stuck with a rock hard gob of epoxy. (It's happened before, even in cold weather) But today I began by pulling up the screws and filling the holes with more epoxy so the deck will be nice and smooth after a final sanding tomorrow. See:

I also trimmed the footwell down so the edges are nice and smooth and used the 1/2" router bit to put a nice round edge on it. Looks pretty good if I may say.... although I have noticed the footwell isn't really very deep. For a tall person like me this will probably be a pain after awhile...

Lastly, the rudder is almost complete now as well. It is very tightly clamped together at the moment while the epoxy cures (the base of the rudder is hollow believe it or not, I am assuming it's designed this way to save weight) I need to add the rudder wing and the cheeks tomorrow, I am looking forward to using the router to smooth out the edges of the cheeks to give the rudder that professional look. A picture of that will come later this week.

On the slate for tomorrow is to start stitching the seatback frames into place and possibly even the rear cabin wall!


Wednesday, January 6, 2010

I Build Boats In Stereo....


Cause I live for the music... no matter what the world comes to...

Ok, no one will understand what that means but it's all good. This blog is for me just as much as it is for you.

One of my favorite things to do in life right now is to head into the garage despite the frigid temps, crank up my speakers connected to my phone and use power tools while listening to Armin, Ferry, and Deadmau5... Nothing makes me happier.

That being said, I finally have a few pictures of hardware being installed on the boat and some of the finer details being worked on. The lower hull will be entirely complete within a week or so... even though I feel behind schedule I'm still pretty pleased considering that epoxy takes 2 or 3 times as long to cure in this weather. (Although, my tenting abilities have advanced considerably) Tenting is essentially covering the areas of the boat where you want the epoxy to cure with a plastic tarp and putting 1 or 2 60 watt work lights inside under the tarp. Under a non-breathable material like plastic, the temp will stay at a steady 65 degrees even if it's -20 on the other side of the plastic. Kinda cool actually. I try to put the lamp near the lowest point until the tarp since thermodynamics more or less dictates that heat rises. (Ok, probably more "more" than "less")
However, in the follow pics you will that the footwell has been installed (via a little coaxing from the hammer)...


And now onto the details... The centerboard pendant sheave has now officially been installed! This is the first notably piece of hardware installed on the boat and quite frankly I am petrified that I will seal it in place by a stray gob of epoxy or something of the sort. Luckily, I only have 1 or 2 steps between now and when it will be sealed up forever inside the centerboard trunk. I had to grind down the bolt in a beautiful but terrifying display of sparks on my grinder. I'm quite sure the grinder is only meant for wood, but fuck it. You use the tools you have, not the ones you want. Right Mr. Dumbfuck Rumsfeld? The bolt is now the perfect length and the acorn nut anchored down beautifully with a squeeze or two or marine caulk. Let's just hope the tiny amount of excess caulk on the bolt doesn't seize the sheave...


Ok, time for Jon Stewart and a delicious Harpoon Celtic Ale.... Yum!


Monday, January 4, 2010

So Cold, and yet So Hot!


Merry Xmas, Happy New Year blah blah blah.... Thankfully my xmas was pretty fun this year, despite my sister yelling at her children in my ear repeatedly. Does it mean I'm getting old when I cringe at the sound of loud noises? Ok, I don't cringe at the sound of loud noises, just my sister. Perhaps that is a separate issue. But X-mas was good, I played with the little princess and enjoyed myself immensely. The food and the beer/wine were also good. A very special shout out to my brother-in-law for placing a shot of JD in front of me without having to ask for it. He knew I needed it. He's a smart man.
So, onto the boat... my apologies for the lack of updates. It has been a busy end of the year with traveling, skiing, working, and general shenanigans. The cold also seriously hampers my ability to work efficiently as epoxy is supposed to have temperatures near 50 to cure properly. I have a mini shop set up in my study to apply epoxy clear coats and since that room gets to about 98 degrees, the epoxy cures in just a couple of hours. Of course, I can't exactly bring the whole boat it, so any structural work has to have lamps set up with plastic draped over to hold the heat in. Surprisingly, a 60 watt light bulb will heat a small area to well over 60 degrees inside a sheet of plastic.
That being said, the interior floorboards have all cut, routed, and varnished and look pretty good in my opinion. The downside is that brass screws suck. They strip repeatedly, and often snap off in the middle making it damn near impossible to get the lower half out of the wood without ripping it apart. However, they don't rust either. I ruined more than a few, which sucks because brass screws cost about 4x as much as regular screws. But you can see how good the floorboards look now that they are installed. I'm not sure it'll be that comfortable to sleep on, but a good foam pad or air mattress should do the trick. Another reason for the length of time between updates is due to how long the floorboards took. I began cutting them around Thanksgiving, but didn't get the final coat of varnish on them until just before X-mas. Of course, they have 3 coats of varnish on top and two on the bottom.
The next step was to cut out the seats, and footwell pieces. If I had been designing this boat I probably would have made the footwell about 6 inches wider and the seats each 3 inches narrower, but I guess my feet are doomed to spend the life of my boat wedged in that footwell while I'm under sail. Oh well. The other notable accomplishment of late was to install the centerboard pendant sheave and shims. I will include a picture of this soon, but basically it is the little roller that the rope which lowers and raises the centerboard slides on. The shims are epoxied around the sheave to keep the rope from jumping off. It seems pretty effective actually. I also purchased some removable access hatches to cover the gaping holes in the centerboard trunk. Again, I will take a picture once they are installed in the next few days.
Tomorrow, I will be applying a final coat of paint to the footwell sides and bottom and hopefully epoxying them in place. Here's a few pics of the seats resting in place (they aren't glued down yet) but you can see how nice the floorboards turned out. I also modified the original layout of the floorboards. The lacewood at my local store was pretty warped and not available in good widths for making 3" wide boards, so I trimmed mine to 2.5". I had to use an extra board on either side but I thought it gave my boat a touch of originality.

Finally, I am working on some boat names now that it is 2010. I am still hoping to have the christening sometime in May, but it may be June or July in reality. Comments or suggestions for boat names are welcome... Right now I'm thinking about:

Ataraxia

Preferably in Greek:

Ἀταραξία


Sunday, November 29, 2009

I Have a Big Deck... (ok, it's not that big)


In case no one has noticed I am wholeheartedly amused by inappropriate sexual innuendo. Deal with it. As you may or may not have been able to guess, I have been fitting the interior deck of the boat over the holiday weekend. I purchased some extremely expensive lacewood a week or so ago and realized upon returning home that a large portion of it was unusable either due to cracks or warping in the wood. However I devised a crude and dangerous yet effective method of putting a straight edge on the wood thereby allowing the decking to look somewhat professional.
The key is to start with a similar length of wood that you already know has a straight edge on it and run it along with the warped wood through the table saw using the straight edge against the fence of the table saw. Clamp the rear of the two pieces of wood together until just before you hit the table and you're good to go. Just don't stand directly behind the pieces of wood as you rip them through the saw. The blade can and will shoot them back directly at your groin if you aren't careful. Thankfully I do not speak from experience here, I just know better. This whole operation is much easier to do without the safety guard and pawls on the table saw by the way. In fact, I hate the safety guard altogether. Just pay extra attention while using your saw if you have no safety measures. Girls don't like guys with no fingers. (However guys like girls with no arms apparently.... She has no arms! Long story...)

So upon finishing the sanding of the interior of the boat (and experiencing early symptoms of Carpal Tunnel due to using my sander for so long) I painted the interior of the boat with 2 coats of primer this week and began fitting the floorboards. They looked pretty crude and unexciting at first until I used the router to put a nice rounded edge on them. I must say that a router is the coolest tool I think I own. It can make such a difference between a professional and an amateur job with a bare minimum of effort. Take a look at the pictures of the floorboards that have been fitted so far...


You'll notice the two breakout sections on either side of the centerboard trunk, they are access ports to access the bilge and either store extra gear and/or ballast. I'm thinking of adding another smaller one towards the aft. Mainly because this seems like a great spot to store potable water on longer journeys should I ever feel the need to take one ;)
I'm also having my roommate design a power supply system for the boat so I won't have to worry about plugging in and charging a battery on shore. But that will come later...

Cheerio...

Still Thirsty...

Visits

HTML hit counter - Quick-counter.net

Visitors